![]()
![]()
![]()
![]()
![]()
![]()
![]()
![]()
![]()


All my content and ptohos
Mikrosha (Микроша)
Although this computer is newer, to know its history we need to go to
1986, to Soviet Union. These times in Soviet Union there were
electronics hobbyists, but hobby electronics was mostly oriented about
analog while digital parts slowly arrived as they were produced. Most
integrated circuits were hardly accessible in official market, it was
possible to buy something on the unofficial (read: taken from the
factory saying that "failed" tests and re-sold a few more times). At
these times in Radio magazine a 8080-powered computer design has been
published under name Radio-86RK (RK - is for "Radio amateur Computer").
It was an improved version of Mikro-80, an earlier design which was
usually impossible to assemble in their conditions as required more than
hundred of logic chips. Radio-86RK used VLSI circuits. Other than 8080
(KR580IK80) there was a 8255 parallel I/O adapter, IK57 (8257) DMA and
VG75 (8275) display controller. This, and usage of 16Kx1 chips (not
triple-voltage as Russians cloned Intel 2118) allowed to close the
computer in a bit more than two dozens of chips on a single board which
was put into a slot of the keyboard PCB.
This was something new and became quickly adopted by hobbyists. The
problems which emerged very quickly was the availability of VLSI
components, especially VG75 display controller, it caused hobbyists to
call for production and selling, as well as resulted in re-building the
chip using TTL logic and 2114s as buffers (1987, May, "Radio" magazine).
Radio-86RK was a design to build yourself. The industrial, ready-made
version was called Mikrosha and was manufactured since late 1986 until
early 1990s. It was made by LEMZ - Lianozovo Electromechanical Plant,
located near Moscow. Contrary to Radio-86RK it had a few improvements.
First, a whole computer has been fit in a single mainboard with a
keyboard. Second, 32kB of RAM has been installed by default in 16
2118-clone chips. Next, 8253 timer has been installed to provide timing
signals used, for example, in a speaker. In the original design speaker
was driven with Interrupt Enable line. Additional interfaces in form of
serial and parallel ones have been exposed, the system bus is also
present. There is still a 2kB ROM containing monitor software only and
BASIC ROM expansion was expensive. Devices have been relocated in the
memory map. While the original Radio-86RK used uppercase cyrilic, here
it's possible to use lowercase too. The computer has been manufactured
in quite significant quantities, being used in schools, culture centers
and clubs, sometimes even households.
| Manufacturer | LEMZ |
|
| Origin | Soviet Union (Russia) |
|
| Year of unit | 1991 | |
| Year of introduction | 1986 | |
| End of production | 1991 | |
| CPU | Intel 8080 | |
| Speed | 1.77MHz | |
| RAM | 32kB | |
| ROM | 2kB | |
| Colors: | 2 | |
| Sound: | Mono, simple speaker. | |
| OS: | None (Monitor), BASIC from tape. |
|
| Display modes: | Text-only 64x25, Cyrilic upper/lower case, Latin uppercase. |
|
|
|
||
|
Power supply:
1, 4 - +5V +5V needs a few amps certainly. |
||
| Media: | Tape, ROM cartridge | |
| I/O: | Built-in keyboard Tape I/O Video out Serial interface Parallel interface System bus |
|
| Possible upgrades: | Some possible | |
| Software accessibility: | Dedicated sites |
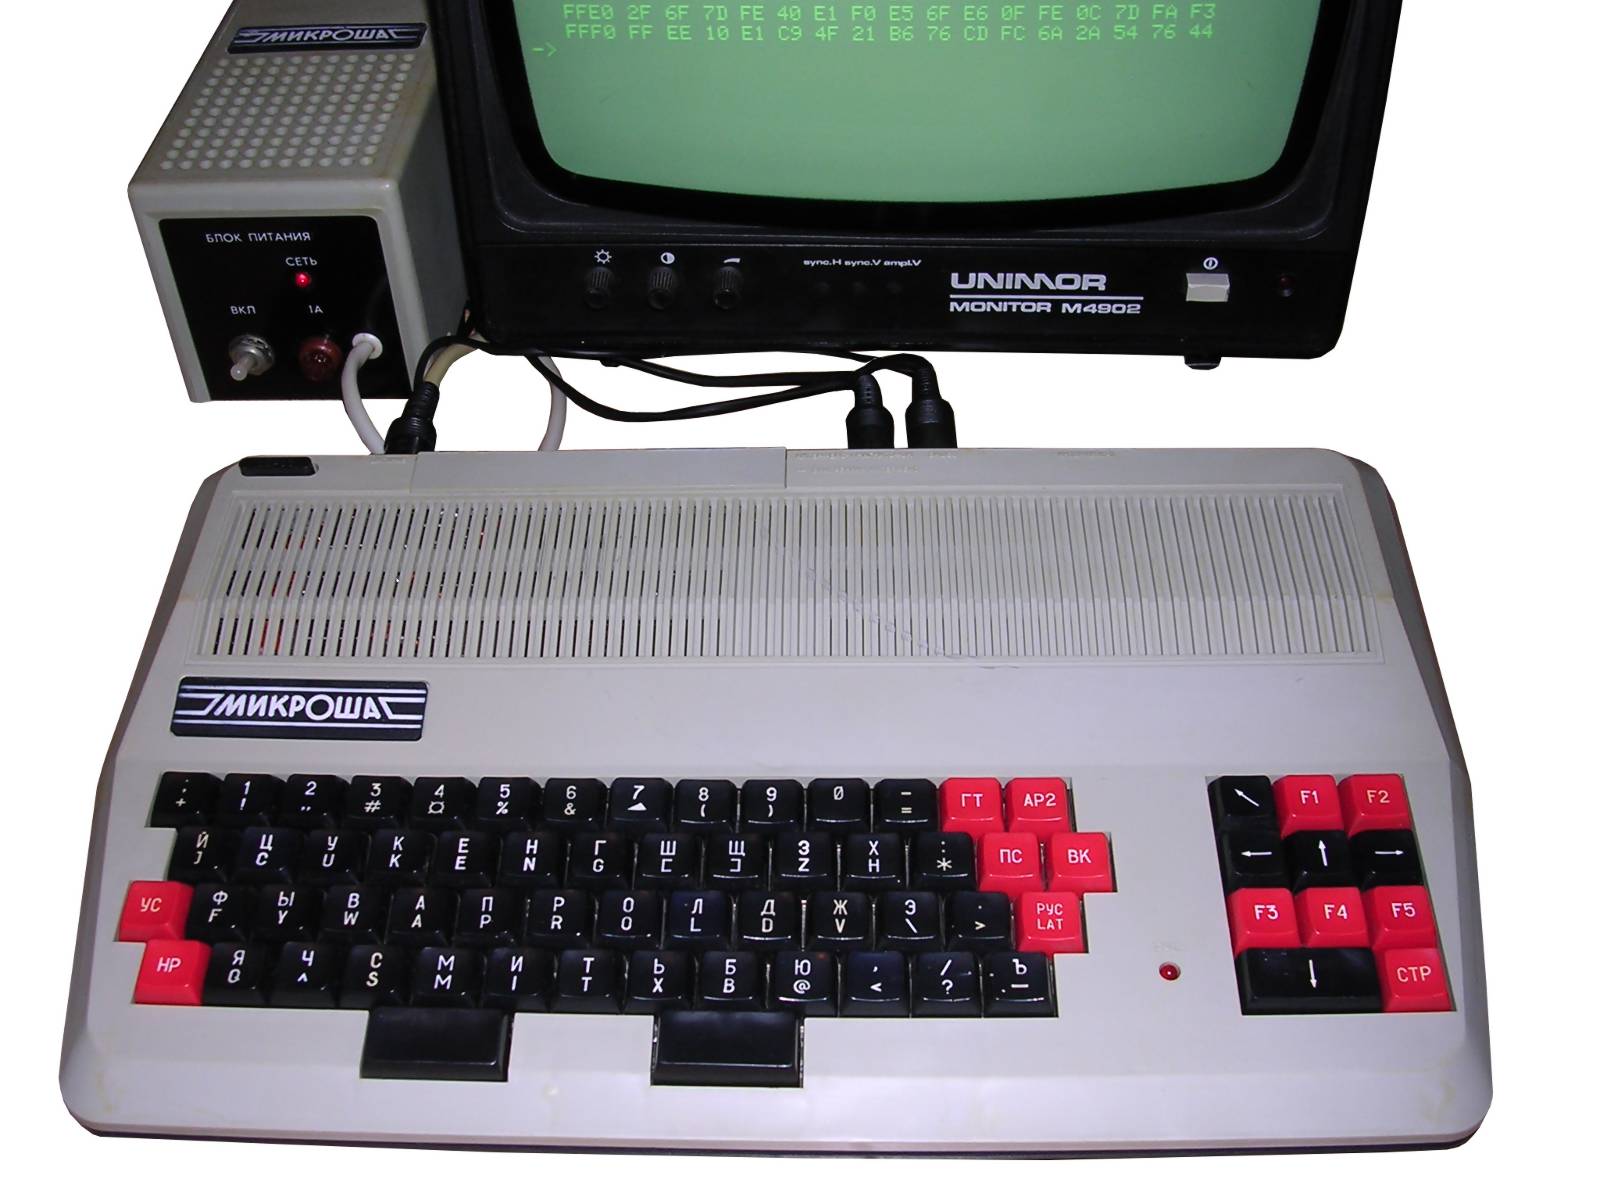
My unit? I have no idea. It is quite late, it's from July 1991. Probably these times, as PCs were on their way, it was distributed as some kind of IT teaching aid because its monitor allows quite deep insight in system operation. The unit has been severely damaged when it arrived, as power supply unit had transistor failed and gave -11.5V instead of -5V and someone tried the unit with this flaw. The voltage destroyed CPU, a few RAM chips have also been bad, as well as a single 8255 and one memory lines multiplexer plus op-amp for tape input. The tape is essential here as BASIC is loaded from tape. The machine has been restored to working condition.
| Contents: | Starting | Formats | Loading | 4164 RAM? | Pinouts | Links |
Starting:
Power the machine up by turning the power supply on.
Then press the left-top button on the computer (not on keyboard) to
supply the fresh Reset signal. In the monitor, you should see a
"МИКРОША" in cyrilic, "->" sign and cursor. Welcome to the monitor.
When the "RUS/LAT" key is pressed, the computer will emit beep and LED
comes up informing that you are entering text in cyrilic. When the "NR"
(latin as "HP") key is held pressed, the character set is changed too
(this is your "Shift" key), including some symbols for mathematical
calculation. You generally input uppercase by default. F1 switches key
set from latin to lower case cyrilic right in the screen. There is no
lower case latin in the computer.
Other F-keys are program-configurable. Usually, by adaptation from
BASIC, F4 means "Stop", "Abort".
The "US" key ("УС"), is a typical "semigraphics shift", for some letters
only. US+G is a bell.
"PS" (ПС) - Cursor goes one line down.
"VK" (BK) - This is your Return key.
"GT" (ГТ) - Tabulation which even sometimes works. Yes, seriously,
program-dependent.
"AR2" (АР2) is traditionally used in different programs as different
function key like modern CTRL.
"STR" (CTP, bottom-right) - clear screen, sometimes "change screen".
There are five arrows, including "home" key.
Back to the monitor, you have 32-character line which, after you fill
it, is automatically accepted. This is a typical behaviour of many
Radio-86 descendants. You can also accept line normally, with return
key.
File formats and making tapes
Programs are in fileland. Most programs for Mikrosha are
binary programs, not BASIC codes. These are generally binary shreds you
have to put in memory. So there are two formats:
- BIN - raw binary dumps. Desceription what to do:
http://home.onego.ru/~rnd/mikrosha/ - Generally use MIK.EXE to catch
BIN from WAV and TOMIK.EXE to get WAV from BIN.
- More software is accessible in RKM format. RK? format is a
format for various Radio-86RK related computers. Different Radio-86RK
descendants have different speeds and different write constant
coefficients or speeds, so programs need to be tuned.
There are two tools for it, both in Russian:
WRKWIN32.EXE - Player for RKM files right to sound card. Usage:
WRKWIN32.EXE file.RKM
It will then ask for value of write constant (default =20), for Mikrosha
answer 24 here. It will then ask for Enter again and will play the file
through default sound card.
Another tool, tested with my unit, is RK2WAV.EXE.
Usage:
RK2WAV [switches] FILE.RKx
Where switches:
-s - smooth square waves. Usually not needed.
-l n - amplitude, n is 1..99
-f n - sampling frequency, n is in Hz
-k n - speed correction relative to RK86's speed (10...1000)
Default settings: No smoothing, amplitude is 75, speed is 100, sampling
frequency is automatic.
For Mikrosha, speed should be set to 65 to compensate for constant's
change. So rk2wav -k 65 FILE.RKM
Outputs FILE.RKM to FILE.WAV
And there is always MESS' castool, no idea will it work. I used RK2WAV
to convert BASIC and Tetris with success.
Loading programs
Some programs in WAV format are in fileland, these are BASICs, Pascal and Tetris.
The manual recommends describing the programs before by
voice and this is a good idea when there is no counter in tape recorder.
Generally it is needed to tune volume "by the ear" or by trial and
error. The "Load from tape" command is a latin I character, so press its
key, do not accept yet. Every computer program starts with ca. 3 seconds
of pilot tone and Mikrosha waits a similar time before timing out, so
play the tape and when you hear (or, if WAV player is used, see it on
bargraph) pilot tone, accept the I by pressing VK. During getting the
tone, only cursor is present. When it "catches" the program, it turns
display off entirely.
If after loading it does not return, press VK and it should return
signalling the abort:
?!I
-МИКРОША-
->
If the program loads well, it displays its information like:
7400
7598
851A
Where: 7400, 7598 - Start and end addresses into which
the program has been loaded and 851A is a program's checksum. These are
examples from manual, usually 0000 is used as the starting address so
you can just run it by commang G [VK].
Checksum error is shown like this:
7400
7598
9621 ?!
851A
Where 9621 is a bad checksum computed from loaded
program.
Writing to tape: Not "I" but "O". The LED will blink and speaker make
noise too.
Monitor
Generally 4-digit number is address, 2-digit is data. There's no
"instant load" of 2-byte word like in Galaksija. If the command has a
comma right near it, it takes zeros as the first argument. Like F,1000.
If there's something wrong with command, its first character will be
changed to ?.
Here are commands as from manual:
- I - Load from tape. Allows to load binary programs to memory. If
address is specified, this is the offset to load.
- D - Dump part of memory in a hex form. Takes two comma-separated
addresses. Halt/slow the screen by holding RUS/LAT or NR. Pressing F4
aborts.
- L - Dump part of memory as symbols.
- M - Enter data from specified address byte by byte in hex.
- F - Fill the range with byte specified. Like F1000,1100,AA fills
0x1000 to 0x1100 with 0xAA.
- T - Copy area to area. Like T100,1FF,1500 copies 0x100-0x1FF to
0x1500-0x15FF. If overlaps, it duplicates first bytes.
- C - Compare two memory areas. Arguments like in T.
- S - search for byte. Arguments: SStart,End,Byte Displays locations.
- O - Write memory area to tape. Takes 2 arguments, like O0,100 will
write first 100 bytes of memory.
- X - View or change CPU registers.
- G - Run the machine code program. Yes, you must know the starting
address, many times it's the first address after loading data which pops
on the screen. This may be usefulin debugging as you can add an ENDING
adress and it will stop.
BASIC
Load BASIC from tape as you load any other program. After loading (tune
the volume precisely!) press G and then Return (VK) to run the program.
Now in simple versions, you WANT to make the first command: NEW. It
generally should trigger, but I found that if something has been loaded
before, it can leave a mess in program memory. It is safe to assume that
variables and stack are clear and NEW resets it with program memory.
Expect simplifications. No LET, just write X=....
There are at least 3 versions of BASIC, and usually if programs in BASIC
were distributed on cassette, there was a BASIC interpreter present at
start. The simple BASIC has no tape capabilities. The more advanced are
BasicMikro and BasicPlus, they have CLOAD. BasicBEST has MLOAD with
similar application.
PASCAL
Yes, procedural and compiled language on Mikrosha. Compiled... it may
take even a few minutes. Load Pascal, on question "NEW" answer "Y".
Press STR to enter editing mode. * will appear.
Loading: AR2+I - it will ask about name, just press return, play tape.
STR to enter translation mode ("PASCAL>"). Enter to run.
More than loading and running:
There are two modes in Mikrosha Pascal: Editor and Compiler, switched
with STR. During switching from compiler to editor, you are always asked
to clear buffer (NEW?) which you usually deny when you are working with
a program. If you want to answer "N" to "NEW" all time, press STR again.
Editor works as typical "Mikron" editor, so let's review it briefly:
F4 inserts character,
F2 deletes character,
AR2+A inserts a new line and turns insert mode on,
Deleting line can be done with block delete: Place cursor on the
beginning of text to remove, AR2+D, place cursor at the end, AR2+E,
To join two lines you (usually accidentally) split with Return, place
cursor on the first one and press PS,
AR2+O writes the text to tape,
AR2+I reads from tape.
To compile and run, just switch to compiler mode and press VK when
PASCAL> prompt is visible after mode switch. Remember that you must make
at least one newline to accept new version of the code to compiler mode,
if not - changes (usually : corrected to ;) will be forgotten when you
enter compiler.
4164 RAM?
I don't know is it needed to work in ROM too, but in
most Mikrosha machines, engineers left electrical option to run with
eight 4164 chips. To install 4164 RAM, you have to:
1. Make sure the A7 line is present and conducted through a whole
leftmost 8 chips in which 4164 are to be. In my unit, one solder was not
present. Buzz this with an ohmmeter!
2. Above "0" key, there are wire bridges looking like this:
11 12 |-------
13 > LA3 chip
10 14 |______
By default, 10-11 and 13-14 are jumpered. You have to re-wire 11-12
instead of 11-10. Leave the second one. If you use the rightmost bank
(and you have A7 there, as in my unit it was not there), it's 13-12.
3. Above keys 2 and 3, you have 4 pins, usually not connected at all:
15 16 17 18
Connect 15-16 and another pair: 17-18.
Second RAM bank remains EMPTY!
I don't know is it needed to work in ROM too, so here are at your own
Pinouts
All connectors are DIN 5 female. Interface 1 is a 3-row connector and System bus is in edge connector.
| Video: 1 - +12V (usually powers modulator) 2 - GND 3 - Monochrome video output |
 |
Tape: 1 - From computer 2 - GND 3 - To computer |
Interface 2 (Serial, TTL): 1 - Output from computer 2 - GND 3 - Input to computer |
Links
-
http://home.onego.ru/~bav9/9.html - Manuals, programs, schematics,
in Russian.
- http://zxbyte.ru/mikrosha.htm
- Description and photos of several early versions as well as a nice
re-made schematics and PCB drawing.
-
http://informatic.ugatu.ac.ru/resources/museum/russian/microsha.htm
- An ?advert?, specification and two photos of early units.
-
http://alemorf.ru/comps/microsha/index.html - Description and files
- http://emu80.org/ - Emulator
-
http://www.emulator3000.org/e3.htm - Emulator with lower system
requirements.
-
http://sensi.org/~tnt23/rk86/index.html - original disk controller
and replica
-
https://github.com/timtashpulatov/rk86kngmd - Disk controller
replica plans. You have to sit these EPROMs one on another, only bending
CS leg of one chip away, and then to the nearby point on mainboard.
-
https://habr.com/ru/post/165053/ - Description in collection
-
http://idn.org.pl/users/lesz/legend/archiw2.html - A Polish review
from 1987. Generally did not made a significant impression.
- http://www.tis.kz/microp.php
- Nice photos and description.
-
http://www.emuverse.ru/wiki/%D0%9C%D0%B8%D0%BA%D1%80%D0%BE%D1%88%D0%B0
- In Emuverse wiki
- http://retropc.org/Mikrosha_s_72.html - In Retro PC Collection
- https://super-geek-news.github.io/articles/413733/index.html - Article
about irst Soviet home computers.